> ## Documentation Index
> Fetch the complete documentation index at: https://docs-dev-feat-docs-5551-enterprise-connect.mintlify.site/llms.txt
> Use this file to discover all available pages before exploring further.

# Coffre-fort

> Décrit comment utiliser le coffre-fort de formulaires pour les actions.

Le coffre-fort vous permet de stocker de manière sécurisée des secrets ou des paramètres courants (par exemple : clés API, jetons d’accès, jetons d’actualisation) pour authentifier les demandes auprès de services externes ou des intégrations en tant que connexions de coffre-fort.

<Callout icon="file-lines" color="#0EA5E9" iconType="regular">
  * Certaines connexions exigent que l’utilisateur fournisse des informations d’identification (par exemple, dans le cas d’une connexion Auth0 avec une application machine-machine (M-M), un jeton d’accès est généré avec un délai d’expiration et un jeton d’actualisation). La connexion stocke les deux jetons et génère un nouveau jeton d’accès avant son expiration.
  * Certains services externes requièrent des permissions pour générer des identifiants d’API. Si vous modifiez les permissions, mettez à jour la connexion à ces services pour éviter les problèmes de connexion.
  * Une fois la connexion ajoutée, vous pouvez l’utiliser dans vos flux. Toute mise à jour d’une connexion existante se propage automatiquement.
</Callout>

## Créer et modifier des connexions au coffre-fort

Créez et modifiez des connexions au coffre-fort depuis la page correspondante ou l’éditeur de flux lorsqu’une action nécessite des identifiants.

### Créer des connexions au coffre-fort depuis la page correspondante

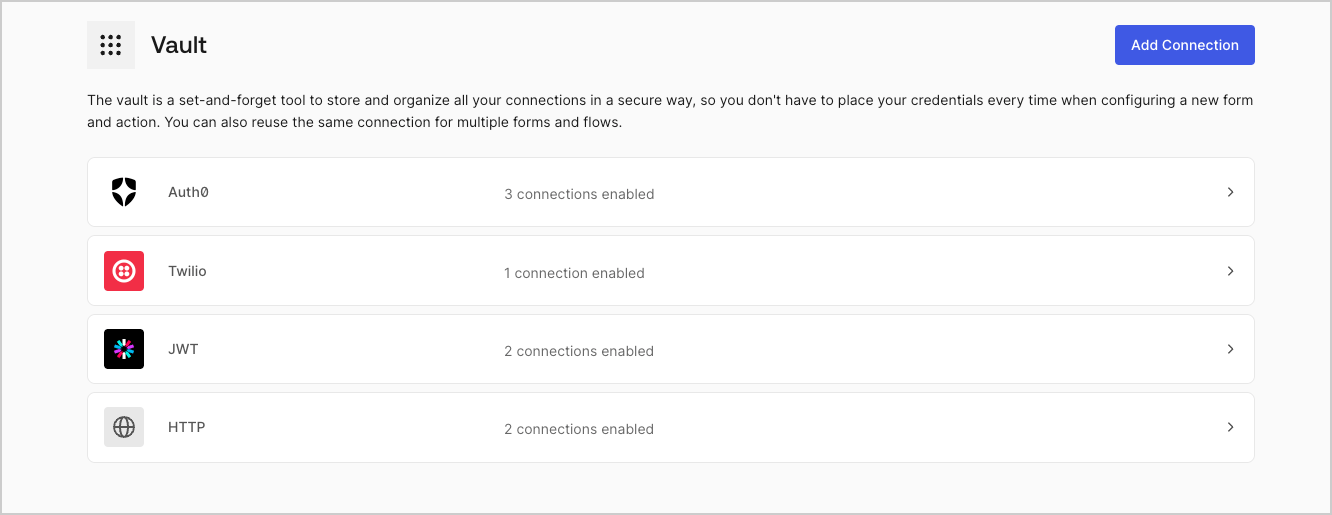
Ajoutez une connexion au coffre-fort depuis la page Coffre-fort en procédant comme suit :

1. Ouvrez l’éditeur de formulaires en sélectionnant **Auth0 Dashboard > Actions > Forms (Formulaires).**

2. En haut à gauche de l’écran, sélectionnez **{"{tenantName}"} > Vault (Coffre-fort)** pour ouvrir la page Vault.
   <Frame>
     <img src="https://mintcdn.com/docs-dev-feat-docs-5551-enterprise-connect/-BeSoHmKHSiveFoe/docs/images/fr-ca/cdy7uua7fh8z/1sPNPKO6nuEDCuiYGRWSur/d85dc616170eaf2d7d5f321750863ccf/vault-connections-example.png?fit=max&auto=format&n=-BeSoHmKHSiveFoe&q=85&s=9cd9f1fea846d82bf25044baefa30c15" alt="Dashboard > Forms > Vault" data-og-width="1332" width="1332" data-og-height="515" height="515" data-path="docs/images/fr-ca/cdy7uua7fh8z/1sPNPKO6nuEDCuiYGRWSur/d85dc616170eaf2d7d5f321750863ccf/vault-connections-example.png" data-optimize="true" data-opv="3" srcset="https://mintcdn.com/docs-dev-feat-docs-5551-enterprise-connect/-BeSoHmKHSiveFoe/docs/images/fr-ca/cdy7uua7fh8z/1sPNPKO6nuEDCuiYGRWSur/d85dc616170eaf2d7d5f321750863ccf/vault-connections-example.png?w=280&fit=max&auto=format&n=-BeSoHmKHSiveFoe&q=85&s=edcbedbb5954b9771802c728596fd0af 280w, https://mintcdn.com/docs-dev-feat-docs-5551-enterprise-connect/-BeSoHmKHSiveFoe/docs/images/fr-ca/cdy7uua7fh8z/1sPNPKO6nuEDCuiYGRWSur/d85dc616170eaf2d7d5f321750863ccf/vault-connections-example.png?w=560&fit=max&auto=format&n=-BeSoHmKHSiveFoe&q=85&s=ffd7e94462c5117d5a9e7c070bd6280f 560w, https://mintcdn.com/docs-dev-feat-docs-5551-enterprise-connect/-BeSoHmKHSiveFoe/docs/images/fr-ca/cdy7uua7fh8z/1sPNPKO6nuEDCuiYGRWSur/d85dc616170eaf2d7d5f321750863ccf/vault-connections-example.png?w=840&fit=max&auto=format&n=-BeSoHmKHSiveFoe&q=85&s=f3c719730ab162b8ba95751673ac8110 840w, https://mintcdn.com/docs-dev-feat-docs-5551-enterprise-connect/-BeSoHmKHSiveFoe/docs/images/fr-ca/cdy7uua7fh8z/1sPNPKO6nuEDCuiYGRWSur/d85dc616170eaf2d7d5f321750863ccf/vault-connections-example.png?w=1100&fit=max&auto=format&n=-BeSoHmKHSiveFoe&q=85&s=d344a8cf71064103b5a951576de983ab 1100w, https://mintcdn.com/docs-dev-feat-docs-5551-enterprise-connect/-BeSoHmKHSiveFoe/docs/images/fr-ca/cdy7uua7fh8z/1sPNPKO6nuEDCuiYGRWSur/d85dc616170eaf2d7d5f321750863ccf/vault-connections-example.png?w=1650&fit=max&auto=format&n=-BeSoHmKHSiveFoe&q=85&s=ec9455fdd3ea644ee28db45992eaa58a 1650w, https://mintcdn.com/docs-dev-feat-docs-5551-enterprise-connect/-BeSoHmKHSiveFoe/docs/images/fr-ca/cdy7uua7fh8z/1sPNPKO6nuEDCuiYGRWSur/d85dc616170eaf2d7d5f321750863ccf/vault-connections-example.png?w=2500&fit=max&auto=format&n=-BeSoHmKHSiveFoe&q=85&s=c43d33614c1eca4209d524b21662a5b9 2500w" />
   </Frame>

3. Sélectionnez **Add Vault Connection (Ajouter une connexion au coffre-fort)**.

4. Sélectionnez l’action désirée, puis **Continue (Continuer)**.

5. Ajoutez un **Connection name (Nom de connexion)** au coffre-fort et sélectionnez **Continue (Continuer)**.

6. Saisissez les identifiants.
   Si vous n’avez pas d’identifiants précis, vous pouvez sélectionner **Create an empty connection (Créer une connexion vide)** et ajouter les identifiants plus tard. Les connexions vides affichent une icône orange qui indiquent l’absence d’identifiants.

7. Sélectionnez **Add Vault Connection (Ajouter une connexion au coffre-fort)**.

### Créer des connexions au coffre-fort depuis l’éditeur de flux

Ajoutez une connexion au coffre-fort à partir d’une action de flux, par exemple, Twilio, en procédant comme suit :

1. Ouvrez l’éditeur de flux en sélectionnant **Auth0 Dashboard > Actions > Forms (Formulaires) > Flows (Flux)**

2. Sélectionnez un flux et ajoutez une action **Send SMS with Twilio (Envoyer un SMS avec Twilio)**.

3. Dans le paramètre **Vault connection (Connexion au coffre-fort)** de l’action, sélectionnez l’icône **+**.

   <Frame>
     <img src="https://mintcdn.com/docs-dev-feat-docs-5551-enterprise-connect/MF945714_MS_cx8_/docs/images/fr-ca/cdy7uua7fh8z/1AsaznhRKxm5LZxPlcbfUw/10e5a8af700aab909f5b03fcd266da7e/twilio-vault-connection.png?fit=max&auto=format&n=MF945714_MS_cx8_&q=85&s=23b53e9fa1b9bc343062ee728a5684f2" alt="Dashboard > Forms > Vault " data-og-width="1104" width="1104" data-og-height="191" height="191" data-path="docs/images/fr-ca/cdy7uua7fh8z/1AsaznhRKxm5LZxPlcbfUw/10e5a8af700aab909f5b03fcd266da7e/twilio-vault-connection.png" data-optimize="true" data-opv="3" srcset="https://mintcdn.com/docs-dev-feat-docs-5551-enterprise-connect/MF945714_MS_cx8_/docs/images/fr-ca/cdy7uua7fh8z/1AsaznhRKxm5LZxPlcbfUw/10e5a8af700aab909f5b03fcd266da7e/twilio-vault-connection.png?w=280&fit=max&auto=format&n=MF945714_MS_cx8_&q=85&s=6446a3d995f531af0ed07ed92cefec88 280w, https://mintcdn.com/docs-dev-feat-docs-5551-enterprise-connect/MF945714_MS_cx8_/docs/images/fr-ca/cdy7uua7fh8z/1AsaznhRKxm5LZxPlcbfUw/10e5a8af700aab909f5b03fcd266da7e/twilio-vault-connection.png?w=560&fit=max&auto=format&n=MF945714_MS_cx8_&q=85&s=b16330fd0518562907ecb4c89059e06c 560w, https://mintcdn.com/docs-dev-feat-docs-5551-enterprise-connect/MF945714_MS_cx8_/docs/images/fr-ca/cdy7uua7fh8z/1AsaznhRKxm5LZxPlcbfUw/10e5a8af700aab909f5b03fcd266da7e/twilio-vault-connection.png?w=840&fit=max&auto=format&n=MF945714_MS_cx8_&q=85&s=848be54a23019b8863310880831511ac 840w, https://mintcdn.com/docs-dev-feat-docs-5551-enterprise-connect/MF945714_MS_cx8_/docs/images/fr-ca/cdy7uua7fh8z/1AsaznhRKxm5LZxPlcbfUw/10e5a8af700aab909f5b03fcd266da7e/twilio-vault-connection.png?w=1100&fit=max&auto=format&n=MF945714_MS_cx8_&q=85&s=8066b0587708a881aadf8dbf67f56b5c 1100w, https://mintcdn.com/docs-dev-feat-docs-5551-enterprise-connect/MF945714_MS_cx8_/docs/images/fr-ca/cdy7uua7fh8z/1AsaznhRKxm5LZxPlcbfUw/10e5a8af700aab909f5b03fcd266da7e/twilio-vault-connection.png?w=1650&fit=max&auto=format&n=MF945714_MS_cx8_&q=85&s=7dfa6233625acb952c8a8e7d3531e350 1650w, https://mintcdn.com/docs-dev-feat-docs-5551-enterprise-connect/MF945714_MS_cx8_/docs/images/fr-ca/cdy7uua7fh8z/1AsaznhRKxm5LZxPlcbfUw/10e5a8af700aab909f5b03fcd266da7e/twilio-vault-connection.png?w=2500&fit=max&auto=format&n=MF945714_MS_cx8_&q=85&s=b943db0e648fe2b380e7292d27027212 2500w" />
   </Frame>

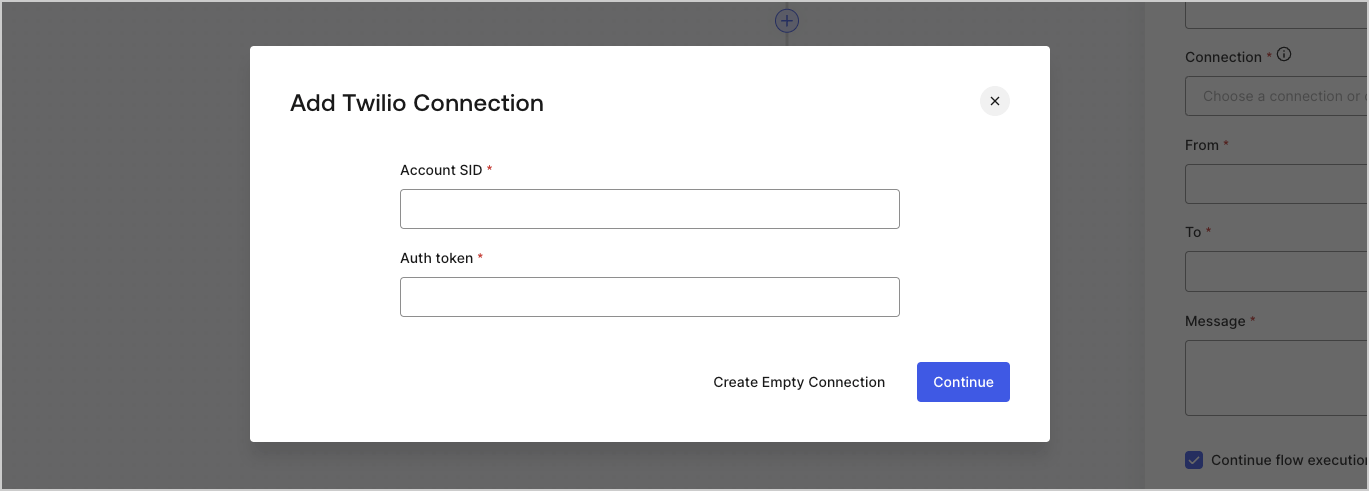
4. Ajoutez un **Connection name (Nom de connexion)** au coffre-fort et sélectionnez **Continue (Continuer)**.

5. Saisissez les identifiants.
   Si vous n’avez pas d’identifiants précis, vous pouvez sélectionner **Create an empty connection (Créer une connexion vide)** et ajouter les identifiants plus tard. Les connexions vides affichent une icône orange qui indiquent l’absence d’identifiants.
   <Frame>
     <img src="https://mintcdn.com/docs-dev-feat-docs-5551-enterprise-connect/IonSBVWf1tysqWTJ/docs/images/fr-ca/cdy7uua7fh8z/yobXanutPRCO3FWek8cOk/bc29e39fb8593cff35e2738234bfe6fe/twilio-vault-settings.png?fit=max&auto=format&n=IonSBVWf1tysqWTJ&q=85&s=fe86d48564dcde2a3698adb766e60954" alt="Dashboard > Forms > Vault > Twilio connection settings" data-og-width="1369" width="1369" data-og-height="491" height="491" data-path="docs/images/fr-ca/cdy7uua7fh8z/yobXanutPRCO3FWek8cOk/bc29e39fb8593cff35e2738234bfe6fe/twilio-vault-settings.png" data-optimize="true" data-opv="3" srcset="https://mintcdn.com/docs-dev-feat-docs-5551-enterprise-connect/IonSBVWf1tysqWTJ/docs/images/fr-ca/cdy7uua7fh8z/yobXanutPRCO3FWek8cOk/bc29e39fb8593cff35e2738234bfe6fe/twilio-vault-settings.png?w=280&fit=max&auto=format&n=IonSBVWf1tysqWTJ&q=85&s=cd314d4cbf50ce77e8a2e96481524821 280w, https://mintcdn.com/docs-dev-feat-docs-5551-enterprise-connect/IonSBVWf1tysqWTJ/docs/images/fr-ca/cdy7uua7fh8z/yobXanutPRCO3FWek8cOk/bc29e39fb8593cff35e2738234bfe6fe/twilio-vault-settings.png?w=560&fit=max&auto=format&n=IonSBVWf1tysqWTJ&q=85&s=5d25670fc3e896a1c258c844f67d9a63 560w, https://mintcdn.com/docs-dev-feat-docs-5551-enterprise-connect/IonSBVWf1tysqWTJ/docs/images/fr-ca/cdy7uua7fh8z/yobXanutPRCO3FWek8cOk/bc29e39fb8593cff35e2738234bfe6fe/twilio-vault-settings.png?w=840&fit=max&auto=format&n=IonSBVWf1tysqWTJ&q=85&s=e499372c0b17e7b39ff6da3e1af5c374 840w, https://mintcdn.com/docs-dev-feat-docs-5551-enterprise-connect/IonSBVWf1tysqWTJ/docs/images/fr-ca/cdy7uua7fh8z/yobXanutPRCO3FWek8cOk/bc29e39fb8593cff35e2738234bfe6fe/twilio-vault-settings.png?w=1100&fit=max&auto=format&n=IonSBVWf1tysqWTJ&q=85&s=7d5bdcfccff7f44fb420614c96d2608a 1100w, https://mintcdn.com/docs-dev-feat-docs-5551-enterprise-connect/IonSBVWf1tysqWTJ/docs/images/fr-ca/cdy7uua7fh8z/yobXanutPRCO3FWek8cOk/bc29e39fb8593cff35e2738234bfe6fe/twilio-vault-settings.png?w=1650&fit=max&auto=format&n=IonSBVWf1tysqWTJ&q=85&s=a7427fb0ee6293f794bd49676a2df468 1650w, https://mintcdn.com/docs-dev-feat-docs-5551-enterprise-connect/IonSBVWf1tysqWTJ/docs/images/fr-ca/cdy7uua7fh8z/yobXanutPRCO3FWek8cOk/bc29e39fb8593cff35e2738234bfe6fe/twilio-vault-settings.png?w=2500&fit=max&auto=format&n=IonSBVWf1tysqWTJ&q=85&s=de115274f682a46baa1fe910eb71e89c 2500w" />
   </Frame>

6. Sélectionnez **Add Vault Connection (Ajouter une connexion au coffre-fort)**.
